|
Life cycle of the Mealworm
They go through four
distinct stages during their life cycle.
-
A female beetle lays
as many as 500 Eggs in her brief lifetime of a
month or two.

-
The eggs are about the
size of the full-stop at the end of this
sentence.
-
After a couple of
weeks the equally tiny larvae emerge from the
eggs.
- The larvae are known
as Mealworms - altho they are not true worms.
-
The larvae seem to
have two purposes in life:
-
Any similarity to a
true worm is incidental
-
Mealworm larvae are
golden yellow and have 13 segments
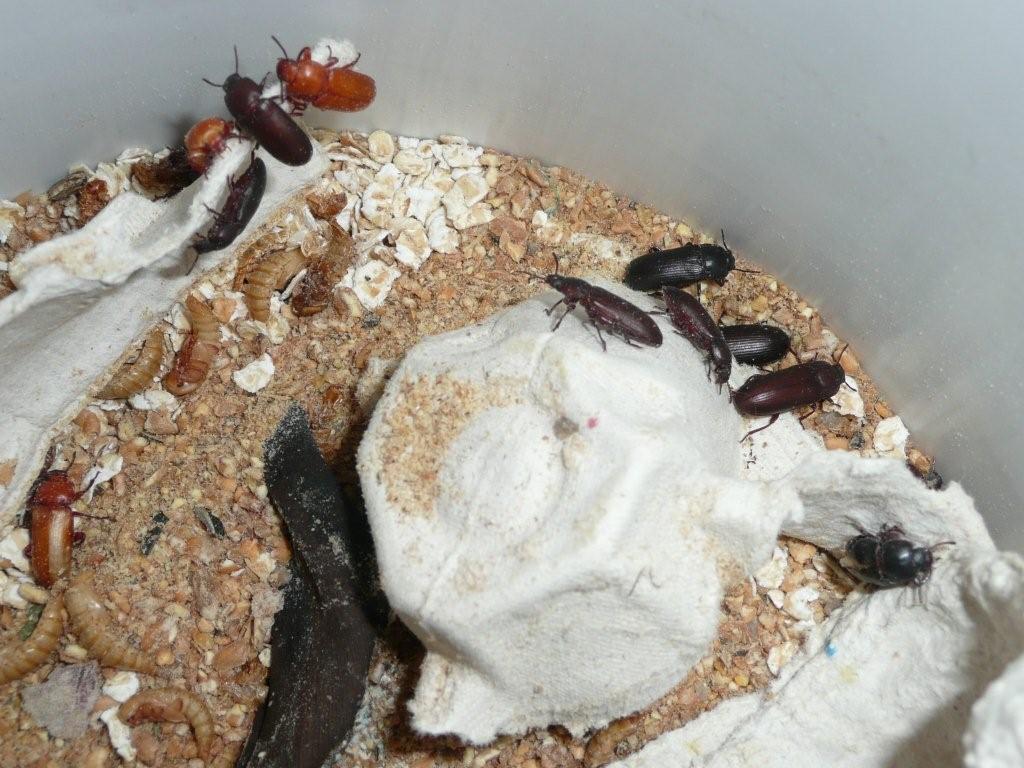
Beetles at all stages + Pupa
-
a head, three
thoracic segments, and nine abdominal
segments
Beetles start off pale>brown>Black
-
Mealworm larvae are
the counterpart of the Butterfly Caterpillar.
-
They pull themselves
around on six stubby legs
-
one pair on each
thoracic segment.
-
Mealworms are the
larval stage of Darkling (Tenebrio) Beetles.
-
Beetles, along with
other insects, are members of the phylum
"Arthropoda",
-
a word meaning
"jointed legs".
-
Like all members of
their phylum, they have their skeleton on the
outside, like a suit of armour.
-
This is practical when
they are under attack but very inconvenient
when they are trying to grow.
-
Arthropods solved this
problem by moulting (shedding) this outer
shell-like cuticle periodically.
-
Immediately following
the moult, the soft white larva expands before
the new larger cuticle hardens.
-
For mealworms this
process repeats five times over a 2-month period
-
after which the
larva is about 3 cm
(just over 1") long.
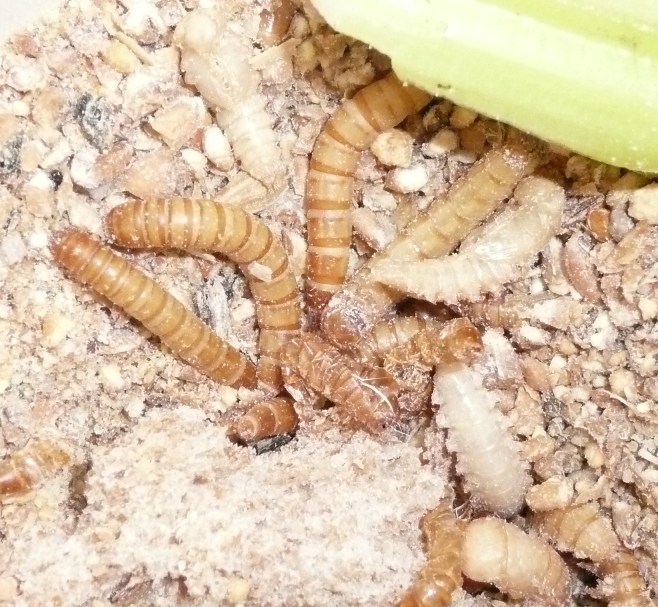
- The final larval moult
reveals the next stage - the PUPA.
-
these are the
"Soft white, caterpillar-looking things"
-
You can see them in
the pictures at the top of the page
-
Click on the
Pictures to enlarge them and see the
Mealworms and Pupae more
clearly.
-
Pupae don't eat and
they don't move except for a twitch when
disturbed.
-
Inside, however, the
mealworm is turning into a Beetle
-
much the same as a
caterpillar turns into a butterfly while
sequestered inside its chrysalis.
-
In 2 - 3 weeks the
Pupa splits open and out walks a beetle,
-
It's white at
first but soon turns brown and finally
black, after a day.
-
The Beetles mate and
lay eggs, and the cycle repeats itself.
Habitat
-
Mealworms and
Darkling Beetles are rarely seen in the wild
-
They are most often
found in barns, grain storage facilities and
food preparation areas.
-
Mealworms and Darkling
Beetles are small but not tiny
-
They don't bite,
smell, fly or jump and they are extremely
easy to care for.
HOW TO MAKE YOUR
MEALWORM FARM
-
You can keep & breed
Mealworms in a large, relatively flat
container with their food source
-
An
ideal start number is approx 1000 mealworms,
-
obviously less, if you start with the Beetles,
as they can lay up to 500 eggs each
-
Male & Female Beetles MUST be present
-
In
the picture below I am using a deeper smaller
tub, as I only had about a hundred Mealworms to
start with.
-
This will provide a constant source of "Live
Food" thru the winter months and into the Spring
-
and into the start of your Breeding Season, when
you need to up the Protein levels for your Birds
to bring them into Breeding condition.
-
Mealworms are a good, High Protein "Live Food"
for your Birds
Ideal
foods Sources are :
-
Wheat Bran, Oat-Bran,
Rolled Oats, Breakfast Flakes/Muesli (If
NO sugar or salt added) or chick starter
mash
-
The food must be kept
dry otherwise it can go mouldy.
- You've heard the
saying, "you are
what you eat"
well this applies to the mealworms when you use
them to feed to your birds.
-
What you have fed
them decides how nutritious they will be for
your birds!
-
This also applies
to the fruit/veg you use as your "Water
Source"
-
as well as the
substrate you use as their basic "Food
Source".
-
Mealworms can go
through their complete life cycle without any
added water
-
They are
very efficient at extracting water from the
fruit/veg you add.
-
It is
recommended that small bits of apple,
potato, carrot, lettuce, Banana etc., be added from
time to time as their "Water Source".
-
Remember to
remove all stale fruit/veg. b4 it goes mouldy
and b4 you add new.
-
They seem to thrive
best when the colony of Mealworms has a large surface area.
-
Keep the bran or the
food source you have decided to use
-
about 2 or 3
cm (±1") deep in a basin, Cat-Litter Tray,
aquarium, or plastic shoe box etc.
-
If the container sides
are steep and smooth, it is not necessary to
keep the container covered.
-
I use an orange mesh
10kg carrot bag doubled over
- this
keeps the container covered but allows
plenty of
air - essential
-
NEVER PUT A solid LID
OVER YOUR CONTAINER - YOUR MEALWORMS MAY
DIE!!
-
Mealworms
can't climb the shiny plastic sides
of a container, so won't escape
Click on Picture to enlarge > >
|
 |
-
Adults and larvae seem
to prefer hiding under bits of paper or light
cardboard
-
I use cardboard
egg boxes which is ideal as it is
undulating and provides shaded areas
-
The Pupae give
no indication that they care either way - they
are in a kind of "Limbo"
The mealworm's preferred
environment
-
Is very dry,
moderately warm and dark.
-
A bit of apple or
other fruit/veg provides extra moisture for the
mealworms and seems to stimulate rapid growth.
-
Keeping the container
on the top of a wardrobe in a warm room seems
and ideal environment.
-
As the temperature
increases, so does the rate at which mealworms
advance through their life cycle.
-
Under ideal
conditions, the complete life cycle can take
place in as little as 3 months
-
but more likely it
will take 4 months.
-
Cold slows the
process almost to the point of suspended
animation.
-
Mealworms can be
put into the refrigerator (not the freezer)
for periods of time to stop metamorphosis.
-
or if you are
storing them to feed to your birds and
don't want them to continue with their
life cycle.
^Top
LIFE CYCLE
-
Most people start out with Mealworms and go thru
all the stages up to eggs being laid and
hatching
-
Others buy them in as Beetles - to cut out a
lot of waiting
-
Keep them in the Bran or Oatmeal with a piece of
Fruit/veg as their water source.
-
Then when they've grown sufficiently and moulted
out of their skins for the final time
-
(they moult approx. 5 times as they grow out
of their skins and shed them)
-
You will see the shed skins like those
of a snake, littered in the Food source.
-
They then turn into the soft white pupa
-
They stay as fairly immobile Pupa for 10 -
20 days
-
At
this point a lot of people
remove the Pupa into a separate container
with similar Food source in the bottom
-
They then hatch out into "Darkling Beetles"
-
They are Pale coloured when they first hatch
but soon darken up into Black
-
Remove
these Beetles and keep them in a separate
container.
-
Use the same Food and water source as for
the Mealworms
-
They can fly but tend not to so keep the
container covered with something they cannot
penetrate but still allows air to circulate
freely.
-
The Beetles will lay their eggs 5 - 10 days
after they have morphed into Beetles
-
You will not see the eggs as they are minute
- as small as a full stop.
-
Eggs Hatch 7 - 14 days after they have been laid
-
You will not see the small mealworms until
they have grown up to about 1/8 - 1/4"
-
Smaller Finches consider them a delicacy
when they are young and soft at this
stage/size of their growth.
-
So, basically they are removed into separate
containers at each stage of their development.
If you order
Mealworms, Beetles/Pupa thru the Post to use in a
Breeding Programme
- What to do
when they arrive.
-
Mealworms &/or Beetles are
usually Posted out in a container with a
"breathing" cap to provide air.
-
Keep the Beetles in a
Warm room/area in low light.
-
At warmer room
temperatures, larvae will soon pupate.
-
Cover Beetles loosely with a
paper towel to provide crawling space.
-
Beetles can fly but
rarely seem to
-
a paper towel
should keep them enclosed where you want
them.
-
or mesh Carrot bag
if they are in the mealworm/pupa stage.
-
THEY MUST HAVE
plenty of AIR CIRCULATING or they MAY DIE !
-
Add slices of potato
or carrot etc (see
above) for moisture and add a substrate of
bran/oats etc. for food.
-
Replace as
necessary or if it becomes mouldy.
If you Order Mealworms
to Feed to your Birds, thru the Post
- Keep them in a cool environment i.e. Fridge (not for human
use preferably!!)
-
They need no special
care but should be used as soon as possible, as
they have a rather short life span.
-
Store in a cool place
at 45 to 65º F out of direct sunlight.
-
Keeping them cool
slows development, so they do not metamorphosise
into Pupae
-
Keep them in a feed
medium (see above) Bran etc.,
-
this keeps them
healthy and nourished until you are ready to
feed them to your Birds.
-
Don't forget to add a small piece
of Fruit/veg as their water source
^
Top
ALTERNATIVES
: Maggots are also interesting
- Feeding them can be done in a number of ways :
- Fresh Maggots - put them into bran or sawdust until the black line
down their bodies disappears (usually a couple of days) you can then
feed then in the same way as mealworm
- Let them form a chrysalis - then feed them direct
- Some people then put the chrysalis into a box with small holes
in the top and as the flies hatch the birds get used to catching them
-but not all birds eat flies
- "Pinkies" are acceptable but many birds don't seem to eat Pink
things -
- there's research going on about colour of feed at Glasgow
university at the moment for which I've supplied the birds - there
wont be any results on that for a couple of years
- Usual cheapest place for mealworm is Priory Pets in Cage Birds
Mag
- - they will happily keep somewhere cool for up to 6 weeks
- so buying in bulk is possible-
- if you do this have to keep them in trays so that you can
constantly add dry food otherwise they sweat and die.
- Alternatively look on Nettles, Beans, Cabbages, Roses etc., for
Aphids, Caterpillars etc.,
- just nip the infested shoots off and feed in a dish to the
birds
^
Top

|