|

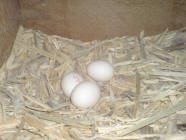
Day 1
|
|
 INCUBATION

A rough guide for the Beginner on how to incubate your Birds Eggs
It shows you how to Candle your Eggs to check they are Fertile
How to
monitor Eggs Turning & Humidity in an Incubator and check
correct
weight loss to help ensure a successful Hatch |
|
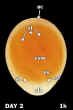
Day 2
|
|
 |
 |
 |
 |
 |
|
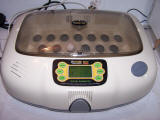
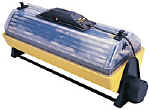
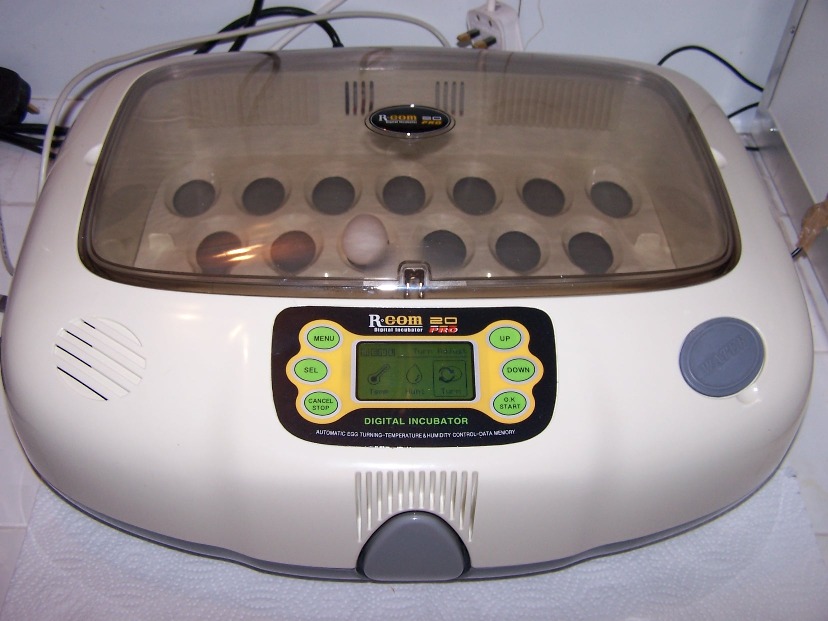
R.Com 20
Pro
INCUBATOR
Temp. can
be set and it turns the eggs every
30 or 60 mins |
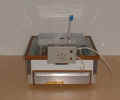
HATCHER
Humidity is very high,
this allows the chick to rotate freely within the
egg, whilst it breaks
out of the shell. |
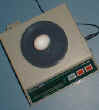
WEIGH
Scales
to weigh your Eggs to help you calculate and maintain your
13 - 15%
weight loss. |
Brinsea Octogan 40 INCUBATOR
Automatic
egg turning >humidity control, high/low temperature >power failure
alarm, wet bulb (humidity) thermometer + digital thermometer.
>no internal moving parts. 2 lift out trays. |
BUDDY HEART MONITOR
registers
the faint heartbeat of the embryo without
disturbing it.
If used correctly, it can also let you know if the
egg is viable or not.
Registers from Day 8+ |
-
If you have cockatoos or similar
Parrot-like birds
that are known to either break their eggs or not feed their young,
then it
can be a more sensible idea to remove the eggs as they are laid and put in
an artificial Incubator to hatch.
|
Firstly you have to decide
on the type of Incubator you wish (or can afford) to use: |
-
You can buy the small,
"still-air" models which are a good bit cheaper to buy than
the "moving-air" models.
-
They can still do the job well but
you have to be a little more aware of uneven Temperature dispersement,
because the air isn't being circulated.
-
They can be hotter at the top than
in the middle or the bottom - so you have to make sure that you have
your Internal thermometer on the same level and near to your eggs, to
register the correct temperature.
-
Most modern Incubators tilt or
turn the eggs automatically, which is essential for the embryo to
develop correctly.
-
If your Incubator doesn't do this
then you will have to do it by hand and this can be quite tying
throughout the day.
-
Moving-Air Incubators, are where
an inbuilt Fan circulates the warm air evenly around the eggs and are a
much better option.
-
They also have the facility to
rotate the eggs, at the correct rate, either on tilting grids or
rollers.
-
Different breeds of birds' eggs
develop better with different rotation of their eggs and at different
rates.
-
You need to be aware that what
works for one breed may not work for another.
-
Psittacine (parrot) eggs should be incubated in
the horizontal position.
-
Ratite eggs are usually incubated vertically, with the
air cell (large end) up.
-
Some Incubators provide an
automatic humidity facility, so the egg doesn't lose too much weight too
quickly due to the heat in the Incubator.
-
Brinsea,
Interhatch & Curfew are 3 well-known manufacturers of Incubators.
 |
Inside a "Moving Air" Incubator showing
both Wooden Rollers
and tilting tray. They can both be used and interchanged in the
same Incubator,
if incubating different breeds of eggs, that require different turning conditions.
<< Click on picture to show bigger picture
|
^Top
|
To ensure the egg develops
correctly to point-of-hatch you need to: |
-
Wash your hands before handling
the egg.
-
Wash the egg, when you first
collect it out of the nest, in a solution of Avi-clens (water steriliser)
and warm water- not too hot but not cold either.
-
Handle carefully as eggs can be
very fragile.
-
Incubate at the correct
temperature - 37.5deg C - is average.
-
Check for your own particular
breed.
-
Make sure your Incubator has been
thoroughly cleaned and sterilised prior to use.
-
On the day you are to put the egg
in - bring your Incubator up to temperature and let it stabilise at
37.5deg C before you put your egg(s) in.
-
he egg has to
be rotated, slowly the correct number of times throughout
the day.
-
This helps to ensure correct
development of the embryo and to stop the yolk rising to the top of the
egg and "sticking" there if the egg is not rotated correctly
during the first half of incubation.
-
Ensure the humidity within the
Incubator is neither too moist nor too dry.
|
If you don't want to incubate
the egg straight away after you have removed it from the nest -
perhaps you want to wait until a full clutch has been laid, so that they
all hatch together: |
-
Wash the egg first (as
described above) before storing it to
help prevent germs permeating thru the
porous egg shell.
-
You must make sure you store the
egg in a cool - but not too cold - place, so that there is no chance of
the Embryo starting to develop, which it will do if conditions are too
warm.
-
Lay the eggs horizontally (on
their sides).
-
You must also make sure that the
egg is rotated, SLOWLY half way round, at least twice per day, to help
prevent the yolk rising to the top of the egg and "sticking"
there.
-
Some people put 2 little marks on
the egg at each 1/2 way stage, so that you know that you have
rotated
180degrees.
-
You can use a felt tip pen to
gently mark the egg - just don't put any pressure on the shell.
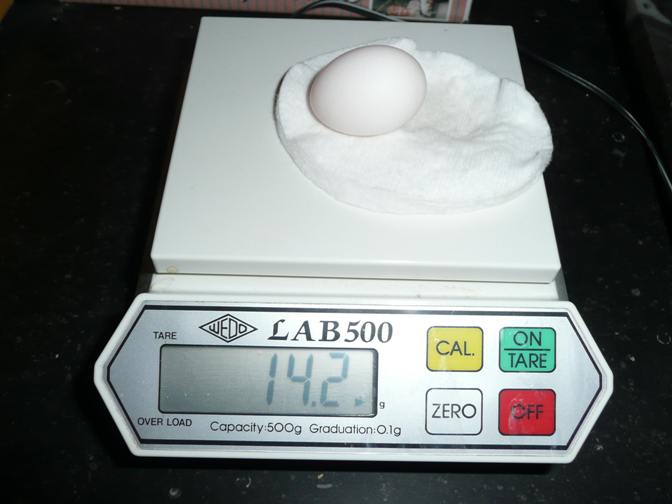
-
You weigh
your egg, use a set of digital scales that weighs in Grams + at least
one or two points after the decimal point.
-
i.e. rather
than your scales showing your egg weighs 15g it's much
better if it shows 15.3g or better
still 15.36g.
-
As the egg is
such a small thing you can monitor your egg's weight loss
much more accurately.
-
Also, try and
get a set of scales that re-sets to Zero.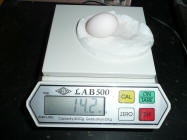
-
By that, I
mean if you put a container on the scales and press the
"zero" button it re-sets to zero, while the container is
still on the Scales. So the weight of the container doesn't
show
-
Much better
than trying to balance your egg on a flat surface and have
it roll around or worse still, roll off the scales
^ Top
|
The Humidity you have your
Incubator at is dictated by: |
-
How much weight your egg is
losing
-
The egg should lose 13 - 15% of
it's start weight to it's "Internal Pip" date.
-
"Internal Pip" is where
the chick puts it's beak through the internal membrane into the air
space at the blunt end of the egg, which usually happens 2 - 2 1/2
days before the "External Pip" (this is when the chick
Hatches).
-
To help ensure that the egg is
losing the appropriate amount of weight at the appropriate rate:
-
- make a graph - with your start
weight on Day one then put the weight less 15% on the day the
Internal Pip would be due - approx. 2 days before
hatch is due
-
- then draw a line between
two - this shows you your optimum rate of weight loss.
-
Put the Number of days to Int. Pip
across the bottom of the Graph (i.e. 1 - 23 days) and the weights
down the left side of the graph.
-
Deduct 15% off your start weight
and this is the amount of weight the egg should lose before Int. Pip.
-
Put your actual start weight on
Day One and a "X" on the graph, every day you weigh your egg
and see whether your Actual Line is above or below the Optimum Line,
then alter the humidity levels accordingly.
-
You then can plot your Actual
weight loss on the graph and if the egg isn't losing enough you need to
lower your humidity.
-
If your egg is losing too much
then you can raise the humidity levels accordingly.
-
Around 30% humidity worked for me
but you need to work out what works best for you.
-
If your Incubator hasn't got
auto-humidity options then you can get a separate hygrometer, which
measures humidity in the atmosphere (or your incubator).
-
Digital ones are more accurate but
the "dial" ones are good too.
-
The same applies to your
Thermometer - if your Incubator hasn't got an integrated thermometer or
temperature-sensing probe.
-
SAMPLE EGG was 15.1 grams
-
15% = 2.26grams > weight
at Int. Pip should be approx 12.84grams
-
14% = 2.11 grams = Int. Pip
weight = 12.99 grams
-
13% = 1.96 grams = Int. Pip
weight = 13.14 grams
**Don't
get too paranoid about the weight,
as they are really to give you a guide on optimum weight loss for a
healthy hatch and to alert you if the weight loss was too much or too
little.
|
You also need to
consider |
How damp the area surrounding
the Incubator is - i.e. are the surfaces washed or the floor washed
regularly - all this can effect humidity levels.
How damp the weather is.
How warm the room or the
weather is etc.Hi Babs,
I came across a very good, simple and cheap way to
calibrate humidity meters. You'd be surprised how
inaccurate most of them
are even when they've just been bought
brand new and if they're not correct, what's the point in having
them!
Get a bottle cap full of table salt, put water drops onto the
salt to make it damp / wet but not runny.
Place the cap and your hygrometer in an air-tight sealed bag or
tupperware tub (it has to be see through).
Leave them sitting still for about 8 hours or so and simply
check to see what it reads.
It should read 75% if it's accurate, and if your meter is higher
or lower and can't be adjusted just remember
what to add or deduct the difference from there on.
Cheers
Carl (Denton Parrots, Carlisle)
^Top
|
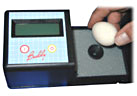
Example of what happens
while an Egg is Developing during Incubation
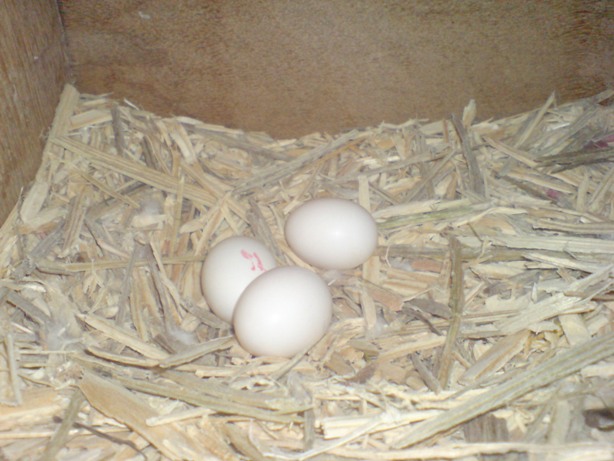
This sample Galah Egg was 15.1grams when laid.
The usual incubation period is 25 days (in an incubator - longer if
parent-incubated) |
-
After approx.
3 - 4 days of incubation
-
If you use a
"Candler" (which usually has a "cold" light)
-
or a bright torch
- (which must never be held too
near to the egg, as it's beam could be hot and could "cook" or
damage the embryo)
-
you should be able to see the beginnings of a blood
ring in the yolk with a tiny dot which is the start of the embryo - if the egg is fertile.
The blood-ring with the dot in
the middle of the Yolk, which is the start of the Embryo, is Very Obvious
and is a deep orangey-red colour.
A bit like the spots of blood you
can sometimes get in a Hen's egg - it's that obvious! -
It is usually starting to form
around day 3 - when it can be seen if you have a good "Candling
light."
-
and is fairly obvious by day 4.
-
If you are still in doubt after 5
days becos you think there may be something "shadowy"
that look like
"something" but u r not sure?? - then the
chances are that the egg will most likely NOT be fertile!
-
It is always wiser not to handle the
egg much, if at all, if you can manage not to.
-
If you do handle the egg always ensure
your hands have either been washed or cleaned with Alchohol rub first.
-
You have to be very aware that once
the Embryo starts to develop, it can be killed or deformed if you rotate
the
egg too quickly or make sudden movements with it, esp. during the first half
of it's development.
-
So, it follows, when examining, that you
rotate the egg very carefully and VERY SLOWLY.
-
5th Day you can see the beginnings of Vein Growth
around the yolk area. 14.8grams
-
6th day one third of the egg is filled with red blood veins. 14.7
grams
-
7th day
approx. 1/2 egg is filled with
veins. 14.6grams
-
8th day
- a heart beat can just be detected! (approx 145 beats
per minute) 14.55grams
-
9th day 182
bpm 14.55grams
(Humidity had to be lowered a little becos. no weight loss from yesterday).
-
10th Day with the egg on it's side the top half is darker and you can see a little
dark-red worm-like embryo. 14.4grams (weight
loss back on course)!
-
11th Day
210 +/- bpm 14.3grams
-
13th Day
egg looks full of veins 210 +/- b.p.m. 14.2grams
-
16th Day
278 +/- bpm Egg looks solid and full - you can see the chick moving if the
light source is right. 14.1grams
-
20th Day
245 bpm. Developing well. 13.8grams
-
As soon as Internal Pip is imminent
(day 21 -22) (for a Galah)
-
you must TURN OFF the "Turn" facility on
your Incubator once internal pip is imminent!
-
- (if this is the only egg in the Incubator).
-
If
more eggs in the incubator that are due to hatch or int. pip at
different times
-
Then turn the heat down 1/2 a
degree. 37.5 deg C - 37deg C
-
The
HUMIDITY must be turned up to MAXIMUM (H60%+ is the minimum)
-
The chick will struggle to get thru
the membrane and shell if the atmosphere is too hot and/or too dry.
-
If you have more than one egg, in the incubator
together, due to
hatch at different times,
-
then the egg due to
Internal Pip must be removed to another Incubator, Brooder or Hatcher
-
With the
turn facility turned and egg racks removed.
-
which
has been set at the lower temp. of 37deg.C
-
with maximum humidity.
-
Put the egg carefully into a margarine
tub
-
with a crinkled piece of slightly
dampened (NOT soggy Wet!) kitchen paper in the bottom.
-
or piece
of flat sponge that has been dampened, so it's going to provide moisture
but is not soggy wet!
-
Just in
case chick hatched and you missed it, I would always put a piece of
Bounty (called "Plenty '09) on top of the wet sponges so that the chick
wouldn't be lying directly on a soggy sponge.
-
Bounty has
the added advantage of not disintegrating like ordinary paper kitchen
towels.
-
- so it will be in
a secure area when it hatches, if you are not there.
21st - 23rd Day Internal
Pip starts. (depends on breed of birds' egg)
-
Can take 48+/- hours to hatch.
-
The day it Int. Pips can depend on
the Heat that the egg has been incubated at.
-
If you have had the Incubator
slightly higher than 37.5deg C throughout incubation
-
Also, the 3rd and 4th+ Eggs are
laid with the Embryo slightly further on in their development, so
that the full clutch (if left under the bird) will hatch out rather
closer together than they were laid.
-
So, I suppose it must follow that
when you are Incubating in an Incubator, that those same eggs would
hatch out earlier than expected.
-
It also depends on what time of day
you put the egg into the Incubator as to the day it starts Int. Pip.
-
If you put the egg in early morning on the first day, then it's
more likely to start Int Pip earlier i.e. on day 22.
-
Whereas, if you put it in late at night on Day one, then it's more
likely to start
Int. Pip on day 23.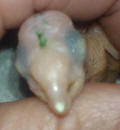
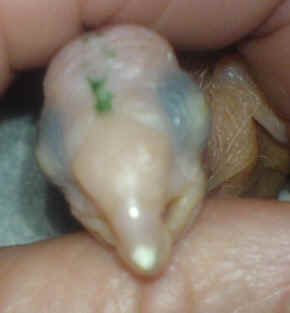
You can actually see the tip of the chicks beak
(the "egg tooth"- see pic >) starting to
penetrate the internal membrane into
the
air space at the blunt end of the egg.
(that's if the egg is
white - darker coloured eggs are more difficult).
-
23rd Day Internal
Pip still - but you can hear lots of "chipping" and "cheeping"
noises now as the chick uses
it's "egg tooth" - the end of it's
beak - to chip away at the inside of the air-space into the eggshell.
-
24th Day
The chick is still trying to break it's way through the shell - it chips
around the inside of the egg on a
level with the air pocket at the
blunt end of the shell, so that when it breaks through it looks as if the
shell has
split in half with jagged edges.
-
25th Day and
the chick hatches - there is often a green slimy bit left in the
bottom half of the egg shell once it
has hatched, with remnants of red vein
impressions, which are still evident on the inside of the egg shell.
-
This denotes a healthy hatch.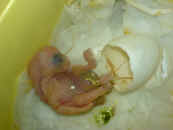
-
It is never a good idea to try and
help the chick out of it's shell, as it needs to go through all these
processes
to hatch successfully
-
-
you can often do more harm than good , if
you interfere!
-
- Unless, of
course the chick is struggling to get out and has been for
some length of time and you think it may be fighting a
losing battle.
-
or there are
other problems and you think the chick might die.
-
- Don't just
go jumping in trying to help as hatching is quite a long
drawn-out process.
-
This Galah Chick was 10.5grams at
hatch-weight and the shell weighed 2 grams.
-
As long as you have an approx. 13 -
15% weight loss overall, all should be well.
-
It has to be said that most problems
happen, if they are going to, during the first half of incubation - once you
have passed the half-way mark there seems to be less things that seem to go
wrong.
-
Once the chick is hatched it is best
left alone to rest for at least 8 - 10 hours.
-
It does NOT require feeding until
these 8 - 10 hours have passed, as it needs to absorb it's egg sac
-
Your first
feed should be just pro-biotic and warm water - let the chick take it at
it's own speed
never tip it into the chicks' beak as you can choke it and it can get the
liquid into it's lungs and die!
-
NOW GO ONTO "Hatch>Wean"
Photos page to get notes on HAND-REARING.
^Top
|
Damaged eggs can be easily
repaired
|
-
If cracked eggs are not repaired, the egg will lose too
much moisture during incubation, resulting in dead-in-shell (DIS)
embryos, or the egg may become infected.
-
Repaired eggs require special monitoring during hatch,
as the repaired areas may prevent the chick from hatching
normally.
-
Thin cracks can be repaired with water-soluble white
glue (like the glue young children use in school).
-
Several coats are usually required.
-
Beak or toenail holes should be repaired.
-
If the defect is too large to be corrected by glue
alone, tissue paper may be used to cover the defect, using several
coats.
-
Repaired eggs should be hand-turned, to check they are
o.k. and weighed
frequently.
EXTRA NOTES on DIFFERENT
BREEDS of Bird AFRICAN GREY PARROTS
Clutch: They lay between 2 and 5 (usually 3) white eggs. They are capable of laying multiple clutches in any
one year - at any time of the year. Egg Weight: Between 22 and 26 grams, 15%
of which is lost during incubation. Incubation period: 30 days AMAZON PARROTS
WET
BULB TEMPERATURE CHARTS
The following table gives wet bulb temperatures
which relate to percentage relative
humidity.
(The figures assume a dry bulb incubation temperature of 37.5°C /
99.8°F.)
|
RH level (%) |
WB Temp °F |
WB Temp °C |
|
20 |
69.1 |
20.6 |
|
25 |
71.6 |
22 |
|
30 |
74.1 |
23.4 |
|
35 |
76.5 |
24.7 |
|
40 |
78.8 |
26 |
|
45 |
80.8 |
27.1 |
|
50 |
82.9 |
28.3 |
|
55 |
84.9 |
29.4 |
|
60 |
86.7 |
30.4 |
|
65 |
88.5 |
31.4 |
|
70 |
90.1 |
32.3 |
|
75 |
91.9 |
33.3 |
|
80 |
83.6 |
34.2 |
|
85 |
95 |
35 |
|
90 |
96.6 |
35.9 |
|
95 |
98.1 |
36.7 |
|
100 |
99.5 |
37.5 |
If the incubation
temperature is different to 37.5°C, compensate by adjusting the
wet bulb thermometer accordingly.
For example: if using the incubator at 36°C with a wet bulb
temperature of 26°C, calculate the RH level using the
27°C wet bulb temperature: = 46%.
Note that the wet bulb thermometer will read the same as the
ordinary (dry bulb) thermometer either at 100% RH or
more probably when the wick dries out.
^Top
|
|

|

|
NEW! Brinsea is proud to announce yet another new product - the EcoGlow chick brooder. The EcoGlow is ideal for keeping newly hatched poultry, game and waterfowl warm. The EcoGlow has three height settings for different sized chicks and its tough plastic construction makes it durable and easy to clean. The EcoGlow runs from a 12v power source for complete peace of mind and uses just 18 Watts of power to keep up to twenty chicks warm. Available March 2010.
|

|
NOW IN STOCK! The OvaView - a very effective low cost all purpose candling lamp ideal for indentifying infertile eggs and monitoring embryo growth. The OvaView is battery powered and uses high output, high efficiency LED illumination. For more information on the OvaView click here... Also new for 2010 is the innovative OvaScope, this works with the OvaView improving the clarity and visibility of the egg and its contents by completely blocking out the ambient light. The egg is slightly magnified and can be rotated for all round view. It can be fitted with a webcam or camera and so is ideal if demonstration purposes. The OvaView and OvaScope are also available to purchase as an egg candling pack -
click here for more details...
|
|
© 2009 Brinsea Products Ltd
Station Road, Sandford, North Somerset BS25 5RA Tel: 0845 226 0120 |
|
^Top
* How does an Egg become a
Bird? *
A fascinating journey : Fertilisation of an Embryo >
formation of the Egg > Hatching and all in between!
http://roseicollis.net/nature.php=

DISCLAIMER
Please also note that all the information on this website is provided in good faith but the Webmaster cannot be responsible for any
mis-information wheresoever or howsoever provided. All opinions, suggestions and Advice are also given with all good intentions and in
good faith but if in doubt should be verified as to their validity prior to accepting./implementing.
Any Medical Advice should never take the place of consulting with your own Avian Vet.
|


